Search This Blog

Lets go..


Manage your Inventory | Grow your restaurant business | Manage your Employee | Control your accounts

Wednesday

How to Install WordPress On Top Of The Bitnami NGINX Stack

Install WordPress On Top Of The Bitnami NGINX Stack

Introduction

If you’re interested in creating a personal or small business blog, chances are that you’re going to use WordPress. WordPress is one of the most popular blogging platforms in the world, used on over 60 million websites (according to Wikipedia). And it is not hard to see why: WordPress is very easy to use, comes with thousands of extensions and themes, is completely free, and is open source.

NGINX is an open source web server that helps developers to improve the security, performance and reliability of their applications. And not only that, it can also function as a proxy server for email (IMAP, POP3, and SMTP) and a reverse proxy and load balancer for HTTP, TCP, and UDP servers.

This guide walks you through the process of installing WordPress on top of a running NGINX server.

Nginx HTTP Server - Third Edition: Harness the power of Nginx to make the most of your in…


Assumptions and prerequisites

This guide makes the following assumptions:

  • You have a basic understanding of NGINX.
  • You have a Bitnami stack installed with an NGINX server - for example, the Bitnami NGINX Stack.

Step 1: Prepare your NGINX server

This step consists of preparing your NGINX server for WordPress. To do so, follow the instructions below:

Approach A: Bitnami installations using system packages

  • Download the latest version of WordPress and extract the files to the /opt/bitnami/wordpress/ directory:

    cd /tmp
    wget https://wordpress.org/latest.tar.gz
    sudo tar xfvz latest.tar.gz -C /opt/bitnami/
    
  • Run the following commands to assign the necessary directory permissions:

    sudo chown -R bitnami:daemon /opt/bitnami/wordpress
    sudo chmod -R g+w /opt/bitnami/wordpress
    
  • Create and edit the /opt/bitnami/nginx/conf/server_blocks/wordpress-server-block.conf file and add the configuration block shown below:

      server {
        listen 80 default_server;
        root /opt/bitnami/wordpress;
        # Catch-all server block
        # See: https://nginx.org/en/docs/http/server_names.html#miscellaneous_names
        server_name _;
    
        index index.php;
    
        location / {
          try_files $uri $uri/ /index.php?q=$uri&$args;
        }
    
        if (!-e $request_filename)
        {
          rewrite ^/(.+)$ /index.php?q=$1 last;
        }
    
        include  "/opt/bitnami/nginx/conf/bitnami/*.conf";
      }
    
  • Create and edit the /opt/bitnami/nginx/conf/server_blocks/wordpress-https-server-block.conf file and add the configuration block shown below:

      server {
          # Port to listen on, can also be set in IP:PORT format
          listen 443 ssl default_server;
          root /opt/bitnami/wordpress;
          # Catch-all server block
          # See: https://nginx.org/en/docs/http/server_names.html#miscellaneous_names
          server_name _;
          ssl_certificate      bitnami/certs/server.crt;
          ssl_certificate_key  bitnami/certs/server.key;
          location / {
            try_files $uri $uri/ /index.php?q=$uri&$args;
          }
          if (!-e $request_filename)
          {
            rewrite ^/(.+)$ /index.php?q=$1 last;
          }
          include  "/opt/bitnami/nginx/conf/bitnami/*.conf";
      }
    
  • Restart NGINX:

    sudo /opt/bitnami/ctlscript.sh restart nginx
    

Approach B: Self-contained Bitnami installations

  • Create a directory for the WordPress installation:

    cd /opt/bitnami/apps
    sudo mkdir wordpress
    sudo mkdir wordpress/conf
    
  • Download the latest version of WordPress and extract the files to the /opt/bitnami/wordpress/ directory:

    cd /tmp
    wget https://wordpress.org/latest.tar.gz
    sudo tar xfvz latest.tar.gz -C /opt/bitnami/apps/wordpress
      sudo mv /opt/bitnami/apps/wordpress/wordpress /opt/bitnami/apps/wordpress/htdocs/
    
  • Run the following commands to assign the necessary directory permissions:

    sudo chown -R bitnami:daemon /opt/bitnami/apps/wordpress/
    sudo chmod -R g+w /opt/bitnami/apps/wordpress/
    
  • Create and edit the /opt/bitnami/apps/wordpress/conf/nginx-prefix.conf file and add the configuration block shown below:

      location / {
        alias "/opt/bitnami/apps/wordpress/htdocs/";
        include "/opt/bitnami/apps/wordpress/conf/nginx-app.conf";
      }
    
  • Create and edit the /opt/bitnami/apps/wordpress/conf/nginx-app.conf file and add the content below to it. This is the main configuration file for your application, so modify it further depending on your application’s requirements.

      if (!-e $request_filename)
      {
        rewrite ^/(.+)$ /index.php?q=$1 last;
      }
      index index.php index.html index.htm;
      location ~ \.php$ {
        fastcgi_split_path_info ^(.+\.php)(/.+)$;
        fastcgi_read_timeout 300;
        fastcgi_pass unix:/opt/bitnami/php/var/run/www.sock;
        fastcgi_index index.php;
        fastcgi_param  SCRIPT_FILENAME $request_filename;
        include fastcgi_params;
      }
    
  • Add the following line to the end of the /opt/bitnami/nginx/conf/bitnami/bitnami-apps-prefix.conf file:

      include "/opt/bitnami/apps/wordpress/conf/nginx-prefix.conf";
    
  • Restart the NGINX server:

    sudo /opt/bitnami/ctlscript.sh restart nginx
    

Step 2: Create and configure the WordPress database

  • Create a database for WordPress.

    mysql -u root -p
      create database bitnami_wordpress;
    
      > NOTE: When you connect to the MySQL database server, 
    you will be prompted to enter the *root* user password. 
    This is the same as the [application password]
    (/aws/faq/get-started/find-credentials/).
    
  • Create a database user for WordPress.

      create user 'bn_wordpress'@'localhost' identified by 'WORDPRESS-PASSWORD';
      grant all privileges on bitnami_wordpress.* to 'bn_wordpress'@'localhost';
      exit
    

    Keep in mind that you must replace the WORDPRESS-PASSWORD placeholder with a user-defined password.

Step 3: Install WordPress

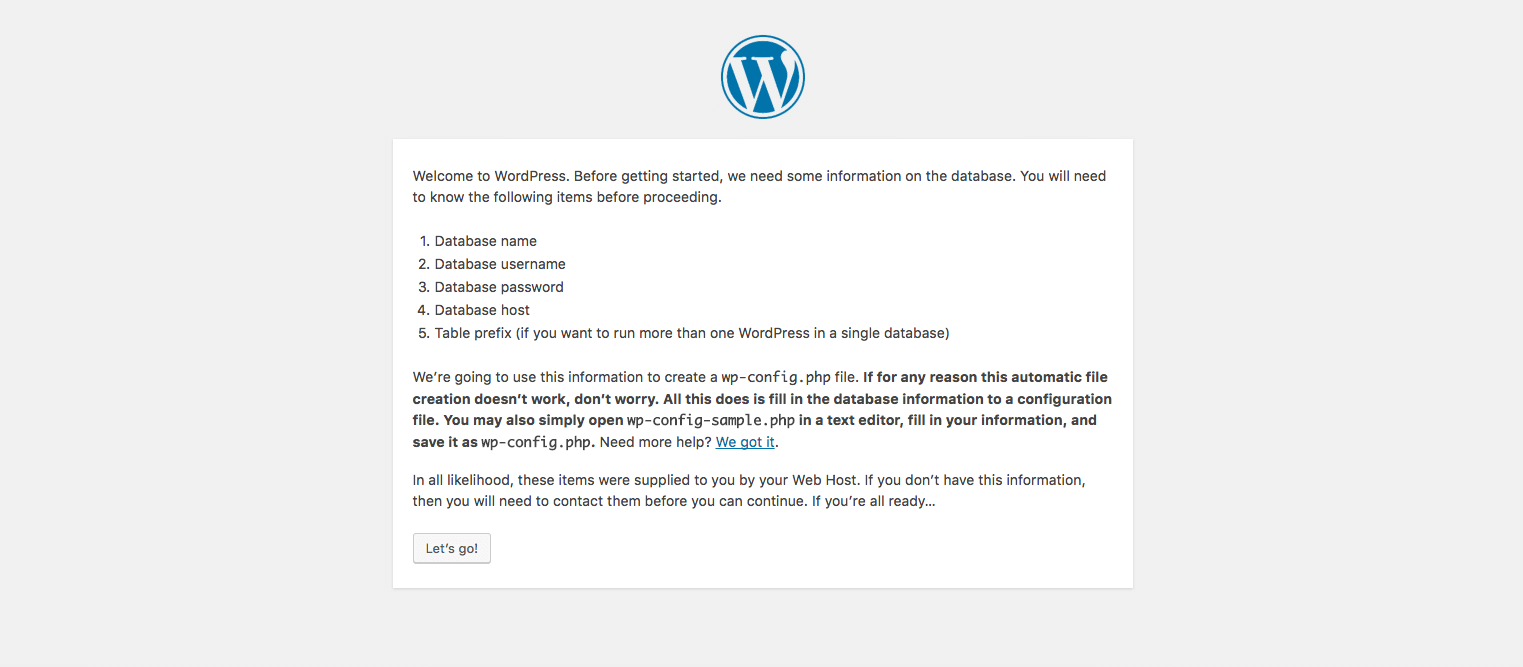
  • Browse to http://SERVER-IP to launch the WordPress Web configuration wizard. Simply follow the steps as prompted by the wizard. Click the “Let’s go” button to start the wizard.

    Start WordPress Database Configuration

  • Use the credentials specified earlier when asked for the database configuration and application credentials, as below:

      Database Name: bitnami_wordpress
      User Name: bn_wordpress
      Password:  WORDPRESS-PASSWORD
      Database Host: localhost
      Table Prefix: wp_
    

    WordPress Database Configuration

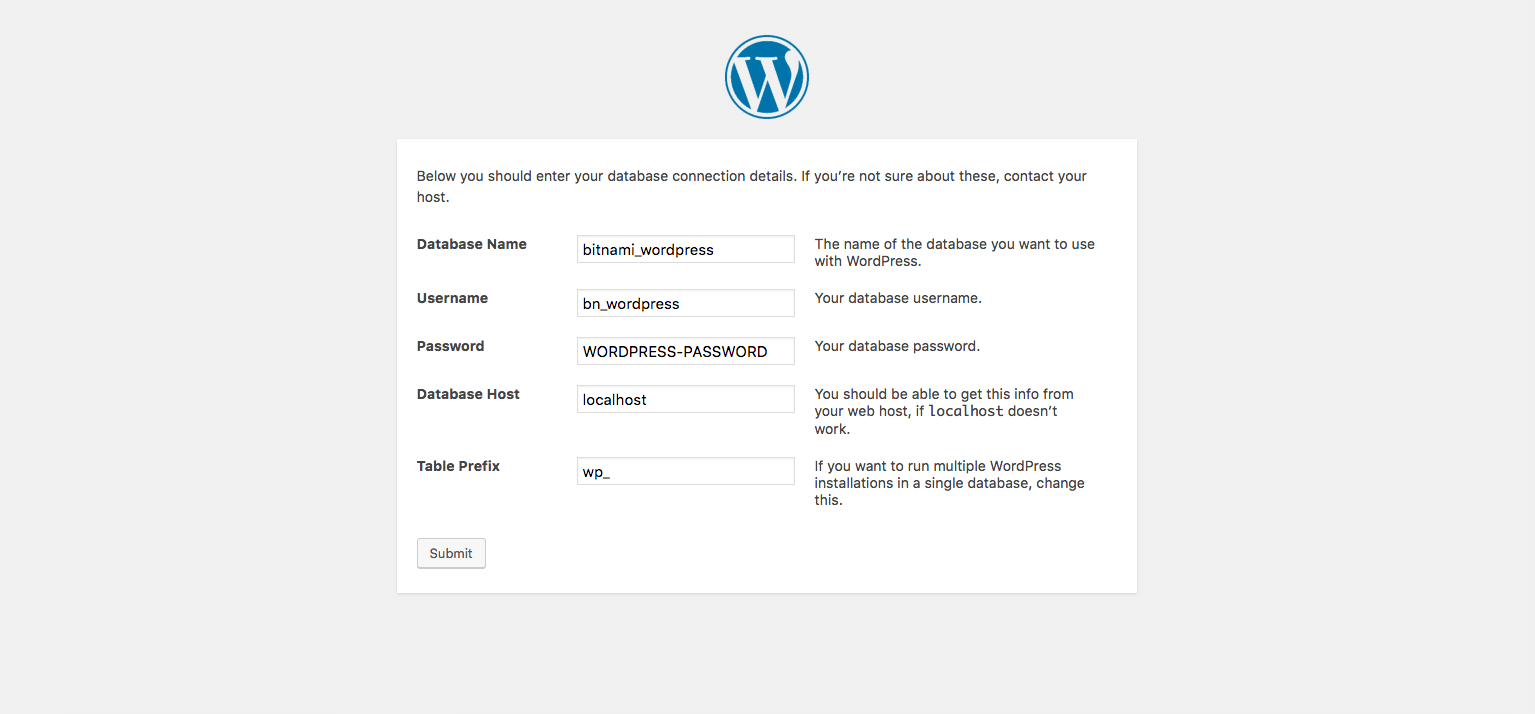
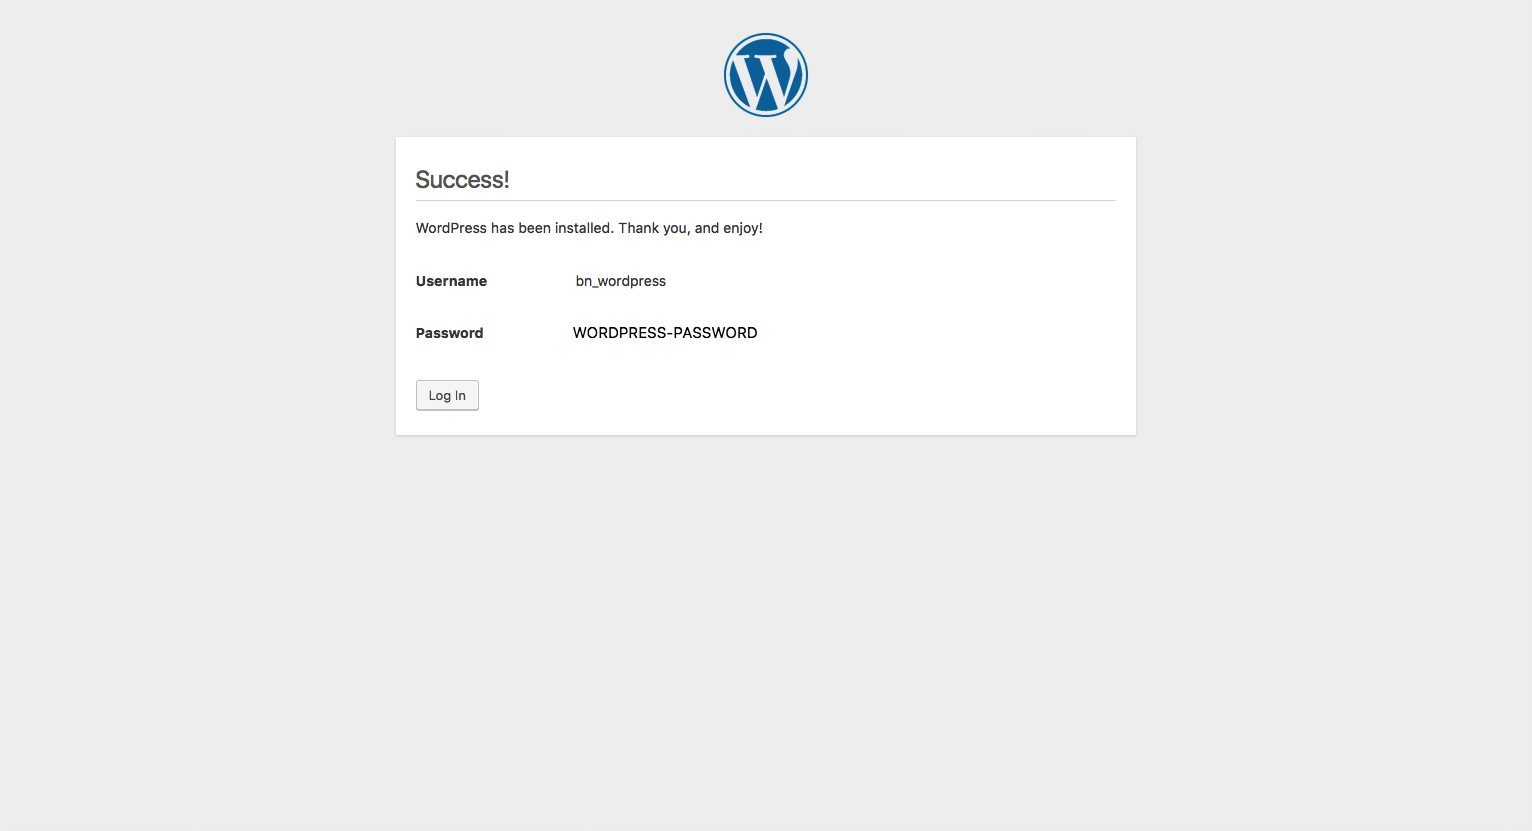
  • Wait for the database connection to be checked. Click the “Run the installation” button.

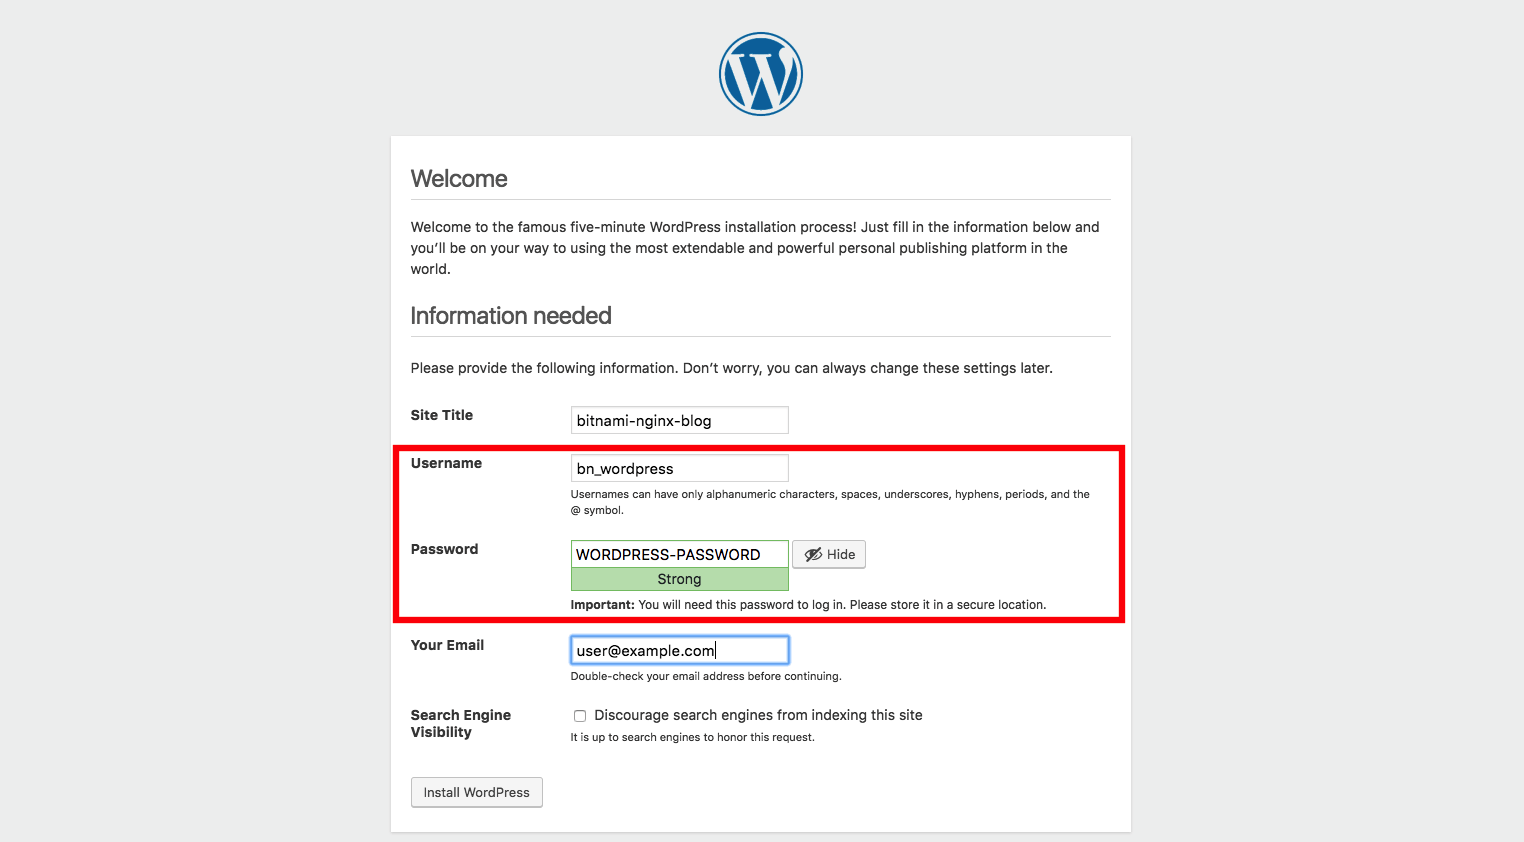
  • End the WordPress installation process by filling in the information needed for the site title and administrator account. Click the “Install WordPress” button.

    IMPORTANT: Use the credentials specified earlier when creating the database user for WordPress. Remember that you must replace the WORDPRESS-PASSWORD placeholder with the same password you defined when creating the database user for WordPress.

    WordPress Database Configuration

    WordPress

Step 4: Configure WordPress plugin authentication and security

The last step is to make some changes to the WordPress configuration file.

Approach A: Bitnami installations using system packages

  • Once the installation process is complete, run the following command to disable FTP authentication for plugin installation:

    sudo echo "define ( 'FS_METHOD', 'direct' );" >> /opt/bitnami/wordpress/wp-config.php
    
  • Change the permissions of the wp-config.file file:

    sudo chmod 640 /opt/bitnami/wordpress/wp-config.php
    sudo chown bitnami:daemon /opt/bitnami/wordpress/wp-config.php
    
  • Check the application has been installed by browsing to the IP address of your NGINX Web server. You should see the screen below:

    Visit your WordPress site

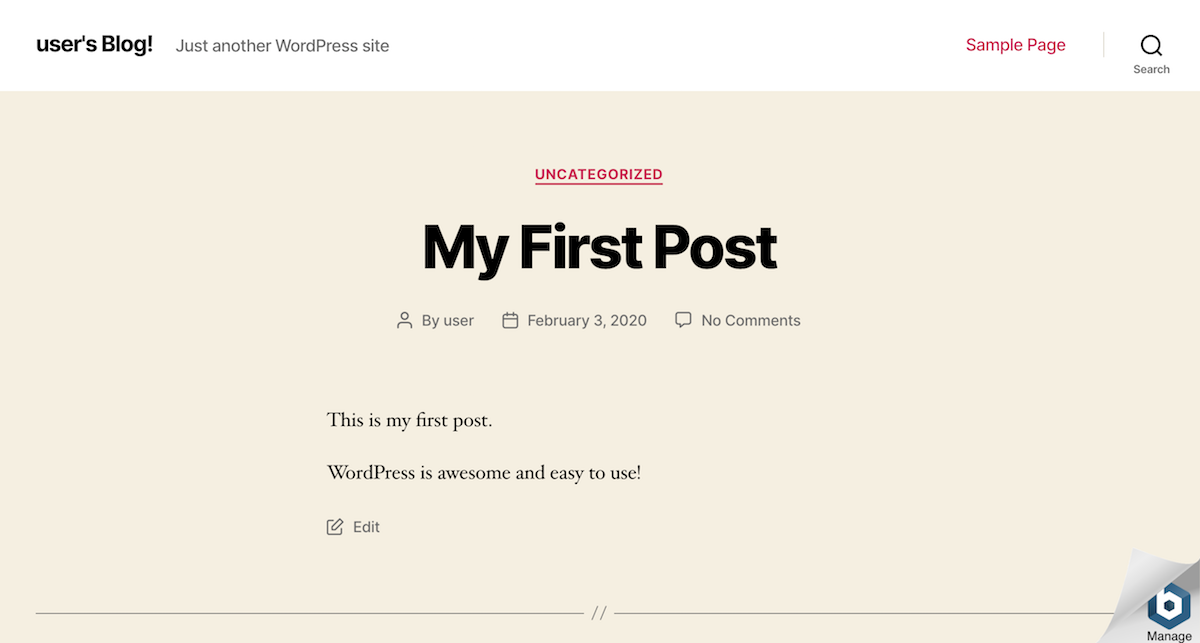
WordPress is now installed. Once installed, you can access the public WordPress site at any time by browsing to the IP address of your NGINX Web server at http://SERVER-IP, and you can access the WordPress administration panel by browsing to http://SERVER-IP/wp-admin.

Approach B: Self-contained Bitnami installations

  • Once the installation process is complete, run the following command to disable FTP authentication for plugin installation:

    sudo echo "define ( 'FS_METHOD', 'direct' );" >> /opt/bitnami/apps/wordpress/htdocs/wp-config.php
    
  • Change the permissions of the wp-config.file file:

    sudo chmod 640 /opt/bitnami/apps/wordpress/htdocs/wp-config.php
    sudo chown bitnami:daemon /opt/bitnami/apps/wordpress/htdocs/wp-config.php
    
  • Check the application has been installed by browsing to the IP address of your NGINX Web server. You should see the screen below:

    Visit your WordPress site

WordPress is now installed. Once installed, you can access the public WordPress website at any time by browsing to the IP address of your NGINX Web server at http://SERVER-IP, and you can access the WordPress administration panel by browsing to http://SERVER-IP/wp-admin.


 Thanks

How to Open ses limit

AMAZON SES Full Setup Guide – Open The Sending Limits!

What is AMAZON SES?

Since you are here, I think you already know what Amazon SES (Simple Email Service) is.

But just in case, Amazon SES is an SMTP service provided by Amazon web services (AWS) that allows you to send emails programmatically or through your own email marketing application (sender) like Mailwizz, Mautic, Mailster, or even Desktop apps, like Super Email Sender, Send blaster or Turbo mailer.

Amazon SES in Other words

  • The sender: (SMTP service) this is the technical part. It allows you to send emails over the internet.
  • The Management Application, where you can configure and manage your Email Lists, Marketing Campaigns, monitor and analyze results, manage your sending servers, and so on.

So we connect both together to get an Email Marketing System.

email marketing system

In our case, The SMTP Part will be Amazon SES.

I thing It's Simple! 

✔️


In this Guide, I will explain how to setup and configure Amazon SES (Simple EMail Service)

Email Marketing Options

When you want to send emails: you need to use a mailing application connected to the SMTP server or service as explained before.

So when it comes to sending email marketing campaigns, you have three options:

  1. Subscribe to one of the email marketing companies like MailChimp, Aweber, GetResponse. It allows you to manage everything (Send Emails, Campaigns, Lists… )
  2. Use an SMTP Service, like Mailgun, SendGrid, Amazon SES… this will require you to use an email marketing application that manages your campaigns and Lists and will use the SMTP service to send emails.
  3. Build an SMTP Server and send unlimited emails, this is out of the scope here, but if you are interested in learning how to build your SMTP server, you can check the following articles:
  • How to Setup SMTP Server and Send Unlimited Emails! (Step by Step Guide)
  • Free SMTP Server Setup with Postal (Step by Step Guide)
  • Power MTA Setup Guide

Why Amazon SES?

Maybe the main reason for selecting Amazon SES as your SMTP Service is the cheap cost.

Do you believe that you can send a 100K email for 10$ Only !?

Yes, it’s cheap.

The other reason, in my opinion, is the High reputation of Amazon IP addresses, which allows you to get a high percentage of inbox deliver bility, for sure, after you follow the following Guide (How To Land Your Emails In Inbox? The Ultimate Guide!).

Amazon SES Requirments

Whenever you want to work with an SMTP service or if you’re going to build your SMTP server, the main requirement is a DOMAIN NAME.

When you send emails, you will be sending from an email address like this one:

mail@chimty.com

So in my case, “chimty.com” is the domain name that I use to send my emails. so simply it’s required to have a domain name to use when you send emails from your SMTP server.

Usually, it’s your website domain name, except if you are working with cold emails, then it’s better to get and use another domain in case it got blacklisted, to keep your main business domain safe.

So if you don’t have a domain yet, go and get one NOW! in order to continue the Setup.

How to get a domain? simply you buy one! and it costs around 10$ per year, so it’s not that big deal!

We have a lot of DOMAIN REGISTRATION PROVIDERS where you can get a domain from like:

  • Godaddy.
  • Namecheap.
  • freenom.
  • Enom.
  • Google Domain.

Here in the course, I will be using Godaddy to get my domain, but you can use any other service if you want, all work in the same way, and if you need any help,  I will be here 🙂

You can watch this 3 minutes video to see how to get and buy a domain from Godaddy Domain Registrar if you are a beginner.


Manage your Inventory | Grow your restaurant business | Manage your Employee | Control your accounts   


Amazon SES Setup.

After that, go down and read more about how to be accepted on Amazon SES and open the limits.

How to be accepted on Amazon SES and increase the sending limit?

This Question may be the main question that I get from people all over the world concerning Amazon SES.

Everyone asks: 

“How I can open amazon sending limits?”
“How can I remove the Amazon SES sandbox mode?”
“How to be accepted by Amazon SES ?” ,
“Am Always being rejected by Amazon, what is the solution, please help!”

These are a sample of hundreds of questions I get every month. And honestly, this is the main reason why I am writing this article.

When it comes to my business, I have my SMTP server besides using Amazon SES and Google GSuite For email Marketing and management.

Mainly, I separate emails in this way:

  • Transactional Emails: Google Gsuite
  • Marketing Emails: Amazon SES and My Server (I distribute the load)

But I was surprised by the number of people being rejected by Amazon SES ! because I don’t remember that I was rejected any time!

I built more than 20-30 SMTP servers this year, I use Amazon SES for a while, and everything is great.

This issue made me do some more deep researches and see why people are being rejected so I get a solution for you.

What I Found!

Unfortunately, I found that 100% of those who contacted me asking on how to be accepted on Amazon SES, don’t even have a website!

Ok, I didn’t mention that it’s required to have a website! What happened now!

Yes, Technically to apply to amazon SES, you don’t need a website. And it’s not obligatory.

But this means that you are almost 70-80% working illegally in email marketing which means you want to send emails to people who didn’t subscribe to your newsletter or you didn’t collect their emails legally, maybe by scraping Facebook or by some google Search queries.

SO YOU WANT TO SPAM!

These methods are considered as spamming for amazon, and for sure you will not be accepted!

for that, having a website that has a registration form or some opt-in forms will help you to prove to amazon or any company, that you are working legally and you collect emails legally, and you are not a spammer.

Of course, I am talking here about honesty, don’t go, and create a temporary sample website and add a form, then apply!

We are in the 21’s century. This dump action is detected instantly with intelligent systems.

So my little advice for you, if you want to start a real business online, you need to have a Website, it can be a WordPress Website or anything that reflects your company and your work.

You can start a blog and collect emails legally using opt-in forms or maybe using Facebook Leads Ad Campaign, or any other legit way for collecting emails.

Then believe me when you apply to amazon with these prerequisites, you will be accepted in less than 24 hours.

By the way, you can join my Free WordPress Super Training Series and learn how to build a WordPress site quickly, check it out here.

Sample Form To Send

Everyone contacted me about increasing sending limits asked me to send the letter that  I used so I was accepted.

It’s not a Magic Trick!

Now I think you know that there are no magic tricks here. It’s just proving that you are not a spammer. So there is no standard letter that I send to be accepted, even every time I post a different message that I write when I want to submit the form to increase the limits on SMTP.

But anyway, I will share with you what I say or what you have to say when you apply for the Limit increase.


Amazon SES – Increase Sending Limits Form.

Case classification

Mail Type: Set as Transactional. Setting as Marketing Emails can cause a deep review of your account. So start with transactional.

Website URL: It’s Important to add your website, and ensure that you have some opt in-forms on it.

Describe how you will comply with AWS Service Terms and AUP:

Mention that you will not send to anyone except your subscribers and that you will validate the emails, and that you always read the terms and ensure you comply with it.

Describe how you will only send to recipients who have specifically requested your mail:

Mention that you have some opt in-forms on your site and people can subscribe to your newsletters through the opt in-forms.

Describe the process that you will follow when you receive bounce and complaint notifications

If you are using Mailwizz or other applications that handle bounces and complaints automatically, then mention that it’s enough.
If not, then you need to mention how you are handling bounces.

Requests

Region: Select your Region.
Limit: Daily Sending Quote.
New Limit Value: Don’t set a weird number like 1M or 100K. keep it small like 1000.

Case description

Example Case Description for a blog with weekly updates:
I have a website that I publish my articles about “pet training” on, and I want to send my subscribers any newly published articles on a weekly bases.
I have some opt in-forms that people can use to subscribe to my newsletters. And I ensure the validity of all emails by using third-party verification services when anyone tries to subscribe. in this way, I ensure almost 0% bounce rates.

 Resource: h-educate.com 


 Manage your Inventory | Grow your restaurant business | Manage your Employee | Control your accounts 


How do you use SES

Use Amazon Simple Email Service (SES)


Introduction

Amazon Simple Email Service (Amazon SES) lets you send transactional email, marketing messages, or any other type of high-quality content to your customers.

Step 1: Create SMTP credentials

To send emails through the Amazon SES SMTP interface, begin by creating SMTP credentials - a user name and a password - as shown below:

  • Log into the AWS Management Console.

  • Click the “SES Email Sending Service” option.Amazon SES configuration


    • In the left navigation bar, click the “SMTP Settings” option.

    • Click the “Create My SMTP Credentials” button.

      Amazon SES configuration

    • Copy your credentials or click the “Download Credentials” button as the password will not be shown again.

    Step 2: Verify an email address

    Add and verify your email address following these steps:

  • Log into the Amazon SES Console.

  • Click the “Verify a New Email Address” link.

  • In the “Verify a New Email Address” dialog, enter the email address you wish to send messages from and click the “Verify This Email Address” button.

    Amazon SES configuration

  • You should now receive a verification message from Amazon SES asking you to confirm that you are the owner of the email address. Click the verification link in the message.

    NOTE: The verification link is only valid for 24 hours after your original request.

  • Check the status of the email address in the Amazon SES Console. The status of the email address should change from “pending verification” to “verified”.

You can now use Amazon SES to send email messages from this address. To send a test email, check the box next to the verified email address, and then click the “Send a Test Email” button. Refer to the Amazon SES documentation for more information.

Step 3: Request removal of Amazon SES restrictions

To protect customers from fraud and abuse, Amazon SES does not immediately grant unlimited Amazon SES usage to new users. A number of restrictions are initially in effect, such as only being able to send email to and from verified email addresses and being limited to a maximum of 200 messages in every 24-hour period.

To remove these restriction on recipient addresses and increase the sending limits, request a higher level of access in the Amazon Support Center.

Step 4: Configure your application to use Amazon SES

The final step is to configure your Bitnami application to use Amazon SES. The procedure to do this varies from application to application but typically, you will need to configure the application with the correct SMTP server information and credentials. This may be done either by directly editing application configuration files or by entering the required information using the application user interface.

Here’s an example of configuring email settings for Amazon SES. The USERNAME and PASSWORD placeholders should be replaced with the correct values from the credentials created in Step 1, while the EMAIL_ADDRESS palceholder should be replaced with any SES-verified email address.

SMTP hosts = email-smtp.us-east-1.amazonaws.com
SMTP port = 465
SMTP security = SSL
SMTP username: USERNAME
SMTP password: PASSWORD
From address: EMAIL_ADDRESS
  • Res:bitnami.com

Difference between SendinBlue and GetResponse

Digital marketers and entrepreneurs now have their tools for marketing. When it comes to Email marketing SendinBlue and GetResponse are two widely used email marketing tools.


SendinBlueGetResponse
Free AccessUnlimited Plan (300 Emails/Day with Unlimited Contacts)30 Days Free Trial
Email Marketing✔️✔️
SMS Marketing✔️❌
Website Chat✔️❌
Autoresponders✔️✔️
Email Templates✔️✔️
Sales Funnel❌✔️
Webinars ❌✔️
Facebook Ads✔️✔️
CRM✔️❌
SMTP Service✔️❌
Pay per emails✔️❌
Cold Mailing❌❌

Now SendinBlue is considered the cheapest and most wide-ranging email automation and marketing. Not only just email marketing, but it also provides SMS marketing, online sessions, advertising through social media, and CRM.

https://affiliates.getresponse.com/en/tools/promotional_materials/565/image


Saturday

SQL exam 70-461 questions and answers part 7


MS-SQL exam 70-461 questions and answers dumps find all part
QUESTION 81
You administer several Microsoft SQL Server 2012 database servers.
Merge replication has been configured for an application that is distributed across offices throughout a wide area network (WAN).
Many of the tables involved in replication use the XML and varchar (max) data types. Occasionally, merge replication fails due to timeout errors.
You need to reduce the occurrence of these timeout errors.
What should you do?
A. Set the Merge agent on the problem subscribers to use the slow link agent profile.
B. Create a snapshot publication, and reconfigure the problem subscribers to use the snapshot publication.
C. Change the Merge agent on the problem subscribers to run continuously.
D. Set the Remote Connection Timeout on the Publisher to 0.

  Ans: A

QUESTION 82
You administer a Microsoft SQL Server 2012 database that has Trustworthy set to on. You create a stored procedure that returns database-level information from Dynamic Management Views. You grant User1 access to execute the stored procedure.
You need to ensure that the stored procedure returns the required information when User1 executes the stored procedure. You need to achieve this goal by granting the minimum permissions required.
What should you do? (Each correct answer presents a complete solution. Choose all that apply.)
A. Create a SQL Server login that has VIEW SERVER STATE permissions. Create an application role and a secured password for the role.
B. Modify the stored procedure to include the EXECUTE AS OWNER statement. Grant VIEW SERVER STATE permissions to the owner of the stored procedure.
C. Create a SQL Server login that has VIEW SERVER STATE permissions. Modify the stored procedure to include the EXECUTE AS {newlogin} statement.
D. Grant the db_owner role on the database to User1.
E. Grant the sysadmin role on the database to User1.


QUESTION 83
You use Microsoft SQL Server 2012 to develop a database application.
You need to implement a computed column that references a lookup table by using an INNER JOIN against another table.
What should you do?
A. Reference a user-defined function within the computed column.
B. Create a BEFORE trigger that maintains the state of the computed column.
C. Add a default constraint to the computed column that implements hard-coded values.
D. Add a default constraint to the computed column that implements hard-coded CASE statements.
Answer: A

QUESTION 84
You administer a Microsoft SQL Server 2012 server.
You plan to deploy new features to an application. You need to evaluate existing and potential clustered and non-clustered indexes that will improve performance.
What should you do?


A. Query the sys.dm_db_index_usage_stats DMV.
B. Query the sys.dm_db_missing_index_details DMV.
C. Use the Database Engine Tuning Advisor.
D. Query the sys.dm_db_missing_index_columns DMV.


Answer: C

QUESTION 84
You administer a Microsoft SQL Server database named Sales.
The database is 3 terabytes in size.
The Sales database is configured as shown in the following table. You discover that Sales_2.ndf is corrupt.
You need to recover the corrupted data in the minimum amount of time.
What should you do?

A. Perform a file restore.
B. Perform a transaction log restore.
C. Perform a restore from a full backup.
D. Perform a filegroup restore.
A


QUESTION 85
What is the difference between the simple CASE expression and the searched CASE expression?
A. The simple CASE expression is used when the database recovery model is simple, and the searched CASE expression is used when it's full or bulk logged.
B. The simple CASE expression compares an input expression to multiple possible expressions in the WHEN clauses, and the searched CASE expression uses independent predicates in the WHEN clauses.
C. The simple CASE expression can be used anywhere in a query, and the searched CASE expression can be used only in the WHERE clause.
D. The simple CASE expression can be used anywhere in a query, and the searched CASE expression can be used only in query filters (ON, WHERE, HAVING).
Answer: B

QUESTION 86
Why is it important to use standard SQL code when possible and know what is standard and what isn't? (Choose all that apply.)
A. It is not important to code using standard SQL.
B. Standard SQL code is more portable between platforms.
C. Standard SQL code is more efficient.
D. Knowing what standard SQL code is makes your knowledge more portable.

Answer: BD


QUESTION 87
Which of the following is not a violation of the relational model?

A. Using ordinal positions for columns
B. Returning duplicate rows
C. Not defining a key in a table
D. Ensuring that all attributes in the result of a query have names

Answer: D

QUESTION 88
You are maintaining a Microsoft SQL Server database that stores order information for an online store
website. The database contains a table that is defined by the following Transact-SQL statement:
You need to ensure that purchase order numbers are used only for a single order.
What should you do?

A. Create a new CLUSTERED constraint on the PurchaseOrderNumber column.
B. Create a new UNIQUE constraint on the PurchaseOrderNumber column.
C. Create a new PRIMARY constraint on the PurchaseOrderNumber column.
D. Create a new FOREIGN KEY constraint on the PurchaseOrderNumber column.


Correct Answer: B

QUESTION 89
You are developing a database in SQL Server 2012 to store information about current employee project assignments.
You are creating a view that uses data from the project assignment table. You need to ensure that the view does not become invalid if the schema of the project assignment table changes.
What should you do?

A. Create the view by using an account in the sysadmin role.
B. Add a DDL trigger to the project assignment table to re-create the view after any schema change.
C. Create the view in a new schema.
D. Add a DDL trigger to the view to block any changes.

Correct Answer: B

QUESTION 90
You are maintaining a Microsoft SQL Server database. You run the following query:
---
You need to ensure that the query performs returns the results as quickly as possible.
Which action should you perform?

A. Add a new index to the ID column of the Person table.
B. Add a new index to the EndDate column of the History table.
C. Create a materialized view that is based on joining data from the ActiveEmployee and History tables.
D. Create a computed column that concatenates the GivenName and SurName columns.

Correct Answer: A